Editing & timeline
The editor has three modes, switched from the segmented control in the top bar:
| Mode | What it's for |
|---|---|
| Media | Your project's clips: import, search, inspect transcripts, drag onto the timeline. See Media library. |
| Edit | The preview, the floating inspector, and the full timeline. This is where the project is actually edited. |
| Rec | Pre-flight config for a new recording — mic, camera, system audio, cursor. See Recording. |
Everything below describes Edit mode: a resizable preview on top, a timeline underneath. Drag the handle between them to rebalance the split.
Floating inspector
A floating icon rail sits over the preview. Six facets:
| Facet | What it controls |
|---|---|
| Background | Image, solid color, or gradient behind your recording — upload your own image or pick from presets. |
| Effects | Background blur, motion blur, shadow, corner roundness, and padding sliders. |
| Layout | Webcam composite: picture-in-picture, vertical stack, dual frame, or no webcam. Mirror, "shrink on zoom," camera shape (rectangle/circle/square/rounded), and size. Drag the webcam bubble directly on the canvas to reposition it. |
| Cursor | Only meaningful for recordings with editable cursor data (macOS/Windows). Show/hide, clip-to-canvas, a strip of cursor themes, and sliders for size, smoothing, motion blur, and click bounce. |
| Captions | Turn captions on, style them, and translate them — see Captions & transcript. |
| Transcript | The aggregated transcript across every clip, editable — see Transcript editing. |
The pencil button on the same rail opens the Edit clip modal for the selected clip: a draggable crop rectangle with numeric X/Y/W/H inputs and aspect-ratio presets, plus the clip's in/out points. Crop is per clip, not per project.
Selecting a region on the timeline (a zoom, trim, annotation, speed, or Full Camera block) replaces the facet body with an inspector for that region, described below alongside each region type.
Saved looks
The palette icon in the header of every style pane saves the current background, effects, cursor, and caption styling as a named look, so the next project starts where this one ended. Apply one with a click, star one as the default for new projects, and tick Include format (aspect ratio) if the shape belongs to the look too. A look never carries anything tied to the footage — no regions, trims, zooms, crop, clips, transcript, or audio gain.
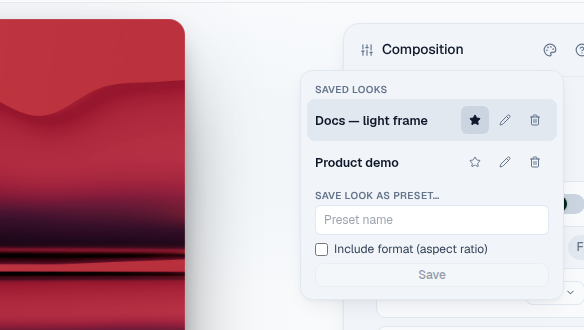 Saved looks: apply, rename, or star one as the default for new projects.
Timeline toolbar
- Auto-enhance (wand icon) — a menu of one-shot passes over the whole timeline, described below.
- Speed (
S) — adds a speed-change region at the playhead. - Comment (
A) — adds an annotation at the playhead. - Trim (
T) — drops a two-second cut ("trim region") at the playhead. Drag its edges to resize, like any other region. - Add zoom (
Z) — drops an animated zoom region at the playhead. - Auto focus (crosshair) — toggle; when on, every zoom region follows the cursor and the per-zoom focus control locks.
- Full Camera (
C) — adds a segment where the webcam takes the whole frame. - Aspect ratio — the output shape for preview and export: your clips' own shapes under Original, plus 16:9, 9:16, 1:1, 4:3, 4:5, 16:10, and 10:16.
Drag a region's edges to resize, or drag the block to move it. Regions snap to the playhead, other region edges, and the timeline's start/end.
Shift + scroll pans the timeline; Ctrl/Cmd + scroll zooms in and out. Both are shown as hints under the transport bar.
Auto-enhance
The wand icon opens a menu of one-shot passes. Each one lands as a single undo step, and none of them runs on its own:
- Automatic zooms — reads the recorded cursor movement and drops zoom regions on the moments where the cursor dwells. No network, no model.
- Zooms at flagged moments — one zoom per flag you set while recording. Flags already covered by a zoom, or sitting inside a trim, are counted and skipped; with no flags in the take, the entry points you at the HUD button instead.
- Remove dead air — cuts long pauses and filler sounds from the transcript's own word timings, on this device.
- Speed up idle time — lays 3× speed regions over stretches where the cursor sits still and nobody is speaking.
- Smart cuts — hands the job to the AI agent instead, which needs a connected provider.
The last two transcript-driven entries stay disabled until the take has a transcript.
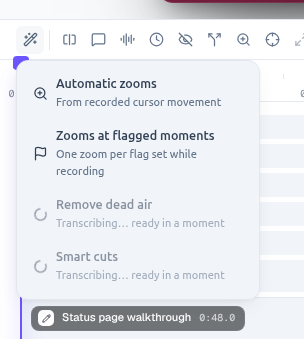 Auto-enhance, with the transcript-driven passes still transcribing.
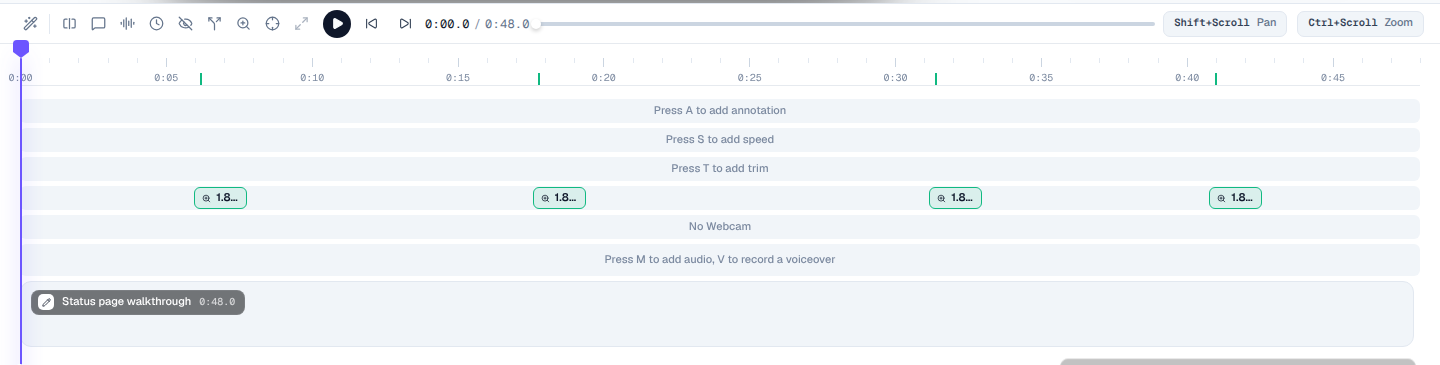 One zoom region per flag set while recording.
Right-click menu
Right-click a region pill for Copy, Paste at playhead, and Delete; right-click a clip for Split at playhead. The Menu key and Shift + F10 open the same menu for the selected pill, and each entry shows the shortcut it runs.
Ctrl/Cmd + V pastes a new region with the copied attributes and length at the playhead. To restyle a region you already have, select it and use Paste attributes (Ctrl/Cmd + Shift + V): the target keeps its place and span and takes everything else from the clipboard, in one undo step. A text annotation keeps its own words — only its look is pasted.
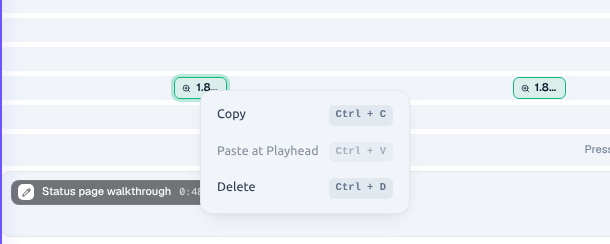 Right-click a region pill for copy, paste, and delete.
Zoom regions
Click a zoom block to open its inspector:
- Six depth presets — 1.25× / 1.5× / 1.8× / 2.2× / 3.5× / 5×.
- 3D rotation — None, Iso, Left, or Right.
- Focus mode — Manual (drag the focus marker in the preview) or Auto (follows the recorded cursor). Locked to Auto when the toolbar's Auto-focus toggle is on.
- Focus position — numeric X/Y percentage in manual mode.
Trim regions
A trimmed span is cut from playback and export. The inspector is a single Delete action — press Del or use the inspector button. The same cuts can be made from the text instead, in the transcript.
Speed regions
A preset dropdown (0.25× through 5×, plus 1× to return to normal) and a free numeric field that accepts anything up to 100×. Export renders the true speed either way.
Full Camera regions
A span where the webcam fills the frame instead of sitting in its layout box — useful for a talking-head intro in the middle of a screen recording. Only meaningful when the recording has a webcam track.
Annotations
Four types, switchable from the Type dropdown in the inspector. Switching type keeps the region's span and box, so a mis-pick costs one click rather than a redraw.
- Text — content, size, background color with an on/off toggle, text color, and an appearance animation (None / Fade / Rise / Pop / Slide Left / Typewriter / Pulse).
- Image — upload a JPG, PNG, GIF, or WebP.
- Arrow — eight directions, stroke width (1–20), and color.
- Blur — a privacy mask. Gaussian or Mosaic, rectangle or oval, with intensity (or mosaic block size). Drag and resize it over the preview like any other annotation.
Freehand blur shapes can no longer be drawn. Existing ones still render, but as their bounding box — deliberately over-covering rather than leaving something you marked private visible in the export. The inspector says so when it sees one.
Cursor styling
If your recording has editable cursor data (native capture on macOS/Windows), the Cursor facet lets you pick from a library of cursor themes and tune size, smoothing, motion blur, and click bounce independently of the raw capture — the underlying cursor path is smoothed deterministically, so what you see in preview matches the final export.
Keyboard shortcuts
The gear icon in the top bar opens the shortcuts dialog, where the configurable ones can be rebound.
| Action | Default |
|---|---|
| Add Zoom | Z |
| Add Trim | T |
| Add Speed | S |
| Add Annotation | A |
| Add Full Camera | C |
| Delete Selected | Ctrl/Cmd + D |
| Play / Pause | Space |
| Copy region | Ctrl/Cmd + C |
| Paste region at playhead | Ctrl/Cmd + V |
| Paste attributes onto the selected region | Ctrl/Cmd + Shift + V |
Fixed (not reassignable):
| Action | Shortcut |
|---|---|
| Undo | Ctrl/Cmd + Z |
| Redo | Ctrl/Cmd + Shift + Z (or + Y) |
| Delete Selected (alt) | Del / ⌫ |
| Cycle annotations forward / backward | Tab / Shift + Tab |
| Frame back / forward | ← / → |
| Pan timeline | Shift + Scroll |
| Zoom timeline | Ctrl + Scroll |
Saving your work
Edits live in a .capturia project file — separate from any exported video, and fully re-editable:
- Save Project (
Ctrl/Cmd + S) — saves in place, or prompts for a location the first time. - Load Project (
Ctrl/Cmd + O) — opens an existing.capturiafile. Projects from older builds (.openscreen,.axcut) still open; the app renames them to.capturiathe first time it lists them. - New Project (
Ctrl/Cmd + N) — clears the current project.
The top bar shows a Saved / Unsaved indicator, and closing with unsaved changes prompts you to save, discard, or cancel.
When you're ready, head to Export.